Ensure that you complete this checklist to ensure that your client’s eCommerce website is ready for a
smooth launch.
This checklist was used for Adobe Commerce Cloud (former Magento2), but in general, you can use it for the community
version as well.
UAT (User Acceptance Testing Checklist)
To ensure a smooth store launch, verify user acceptance criteria in the Staging and Production environments. Write these
tests as a checklist of test steps and expected results per feature, extensions, custom code, and merchant and customer
actions.
-
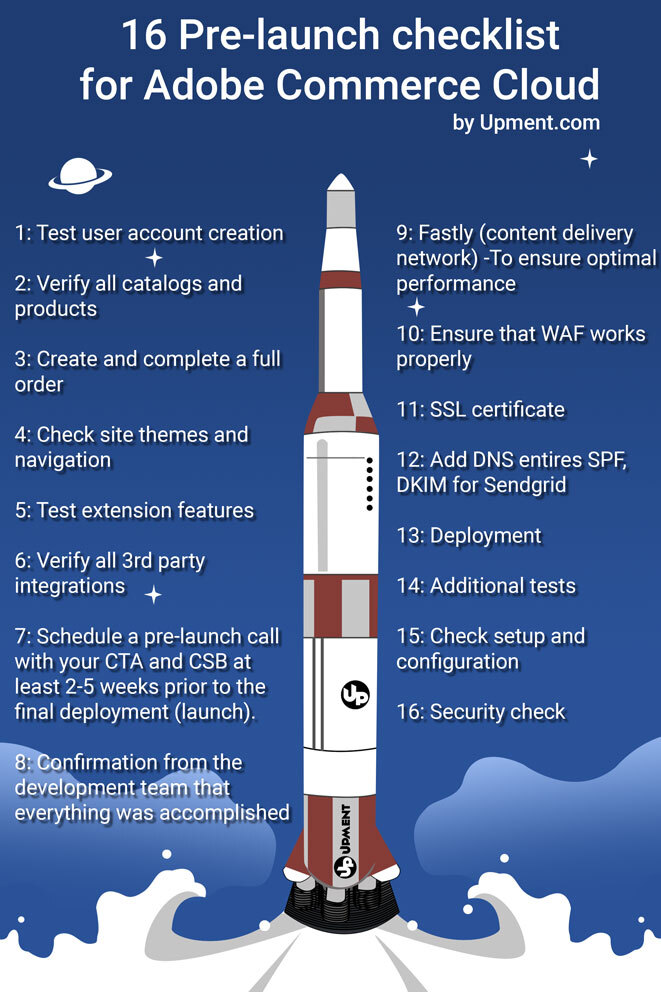
Test user account creation
Test every action your customers may use for their accounts. Attempt creating an account, modifying addresses, and any
additional features, including resetting the password
-
Verify all catalogs and products
Products provide simple to advanced options, including configurable and bundled types, pricing options, inventory, and
categories. Create tests for merchant’s management and customer purchases
-
Create and complete a full order
These tests cover multiple steps for modifying a cart, verifying payment gateways, receiving completed order data, and
email notifications to the customer. Also, consider options for returns and reorders4. Manage entered orders
Orders can include complicated tasks from shipping to refunds, affecting your completed sales and revenue. Ensure every
process correctly completes as a customer and merchant
-
Check site themes and navigation
Test every page of your site, including look and feel, responsive design, contact links, searches, and vital information
pages supporting your business, including contact and terms and conditions
-
Test extension features
All extensions and custom code affect various aspects of your store. Heavily test all interactions to ensure actions are
complete and data saves to the database. Some extensions may have dependencies between each other and Magento is not
experienced until in a Staging or Production environment
-
Verify all 3rd party integrations
Integrations with 3rd party services may include Magento extensions and custom code connecting through APIs and token
authentication.
Heavily test your integrations to ensure all data transactions are closed properly: from your eCommerce platform to the
service, and back into your store (Magento again)
Final pre-launch steps
-
Schedule a pre-launch call with your CTA (customer technical
advocate) and CSB (customer success manager) at least 2-5 weeks prior to the final deployment
(launch).
During this call, all parties, including the development agency and the client, should review the checklist provided
below.
The time and date of the launch should be confirmed during this call. If there are any changes to the launch schedule,
it is important that everybody is notified as soon as possible.
-
Confirmation from the development team that everything was
accomplished
The system integrator has completed all user acceptance testing (UAT) on both environments – staging & production.
This means that the staging environment works properly with all third-party integrations if any.
Also, the client should now perform their own UAT checklist, which should include testing of backend functionality
specific to their business.
You can find more information about UAT testing in the Magento DevDocs.
-
Fastly (content delivery network) -To ensure optimal
performance,
you should take the following steps:
- Verify that Fastly extension (which controls media files) is enabled.
- Check that all content is being cached correctly by Fastly.
- Enable Fastly Image Optimization. Before doing this, you should make sure that the correct shield location is
configured. - Keep in mind that Fastly will only work for your specific domain name. Any updates to your domain name since
onboarding with Adobe Commerce should be submitted through a ticket to support department. - Make sure you have requested all necessary domain names during the onboarding process with Adobe Commerce.
By following these steps, you can ensure that your CDN-Fastly is set up and configured correctly for your website.
Perform tests to make sure Fastly (CDN) was setup properly:
1. Projects without Origin Cloaking are tested at https://magento-tester.global.ssl.fastly.net/magento-tester.
2. Projects with Origin Cloaking are tested at https://magento-tester.global.ssl.fastly.net/magento-tester-new.
-
Ensure that WAF (web application firewall) works
properly
If you are experiencing incidents where the web application firewall (WAF) is blocking requests incorrectly (also known
as false positives), you may need to troubleshoot the issue.
To do this, you can refer to the “Troubleshooting blocked requests” documentation.
This should provide you with the necessary information and guidance on how to identify and resolve any issues related to
the WAF blocking requests incorrectly.
In order to use WAF you need to switch on Fastly.
- SSL certificate
To obtain an SSL certificate for your production domains (such as your-domain.com and www.your-domain.com), you need to
add the ACME challenge CNAME records provided by your CTA (customer technical advocate) or Magento Support.
These records will allow the SSL certificate to be applied to the requested domains without interrupting the existing
live site or redirecting it to Fastly. Add these records at any time for both preproduction and production domains, but
it is recommended to do so as soon as possible.
You can find instructions for setting up Fastly here.
To use SSL, your store platform (Adobe Commerce or former Magento) has to verify that you own each domain in your
Cloud environments.
For pre-production URLs (such as mcstaging.domain.com, mcprod.domain.com, etc.), you can add a CNAME record that points
to the Fastly URL (prod.magentocloud.map.fastly.net). This will automatically validate the domains twice daily.
- Add DNS entires SPF,DKIM for Sendgrid
To set up SendGrid for your domains, follow these steps:
- Add CNAME records to your domain name server. Check your account for all record information.
- More detailed instructions on configuring SendGrid here.
- The monthly limit for transactional emails is 12k. If you need to increase this limit, you should open ticket.
- To verify that the configuration is correct, you can use “dig”to check CNAME records.
By completing these steps, you should be able to set up and configure SendGrid for your domains.
- Deployment
Verify that all code was tested, reviewed and successfully deployed on all 3 environments (integration, staging &
production). For more information, see the “Test deployment” documentation.
Choose a magento agency that follows best practices for
development and deployment. This includes checking if minification has being enabled for static content JavaScript &
CSS & HTML (as described here) and minimizing downtime during deploymentto the production environment.
- Additional tests
To test that your outgoing emails are functioning correctly, you can use the SendGrid service for transactional emails.
Sendgrind is included as the default MTA in your plan. This will allow you to send test emails and verify that they are
being delivered as expected.
Check if there are any blocking tickets with Magento that need to be resolved before the launch. Go to your dashboard.
Perform stress test on live (production) envirnoment. If any issue contact your Adobe Cloud Commerce customer technical
advisor (CTA).
Be careful not to whilst testing transactional emails during load testing, because default configured send limit for
Sendgrid before launch equals 12k.
Turn off email sending during testing through the backend.
Conduct penetration testing to identify and address any vulnerabilities in the site. This will help ensure that the
website is secure and compliant with industry standards.
- Check setup and configuration
Enable indexing on schedule
Update routes (here) and add proper redirects if necessary contact CTA
Use latest ECE Tools version
Disable xDebugger if still enabled
Update TTL in your DNS settings, reduce to min.
Enable New Relic
- Security check
Update store admin URL (change default) and update password for live envirnoment
Enable two-factor authentication
Remove redundant users